Using the Database Client with Snowflake
Snowflake is a cloud-based database which can be used as an RDBMS for the emtelliPro database. Compatibility with the emtelliPro database client is achieved using the Snowflake plugin for SQLAlchemy, the ORM that the emtelliPro database client uses. This document aims to walk the user through installing the Snowflake plugin for SQLAlchemy, as well as creating a Snowflake-based emtelliPro database and schema and processing documents with the emtellPro client for storage in a Snowflake-based emtelliPro database.
Direct Insertion into Snowflake
The steps for this howto are:
Install the emtelliPro Database Client and Snowflake SQLAlchemy plugin
Create a database in Snowflake
Create the emtelliPro tables/schema in the new database
Process a document and store the output in the new database
Step 1: Install the Required Software
These instructions are for Linux; however performing these steps on MacOS or Windows will be similar but may require slight changes to the commands depending on the OS and shell used.
First, download and install the SDK/clients using the instrucions from Basic Client and Database Client. Or, for convenience, the commands to run to install the basic and database clients are:
python3 -m venv venv
source venv/bin/activate
pip install --upgrade wheel setuptools
pip install emtellipro-VERSION-py3-none-any.whl
(where VERSION in the filename in last command above is the version of the SDK you’re installing).
Now, let’s install the Snowflake plugin for SQLAlchemy:
pip install --upgrade snowflake-sqlalchemy
Finally, you should test your installation to ensure that the emtelliPro database client is working. Ensure that you’re still within the Python virtualenv and execute the following:
emtellipro-db-client --version
If you have a working emtelliPro database client, you should see output similar to:
emtellipro-db-client, version 5.10.1
Step 2: Create a Database in Snowflake
The screenshots and commands in this section may vary slightly for your version of Snowflake.
First, go to the ‘Warehouses’ tab in the Snowflake UI and ensure that the warehouse that you’re going to use
is in status Started, as shown in the screenshot below:
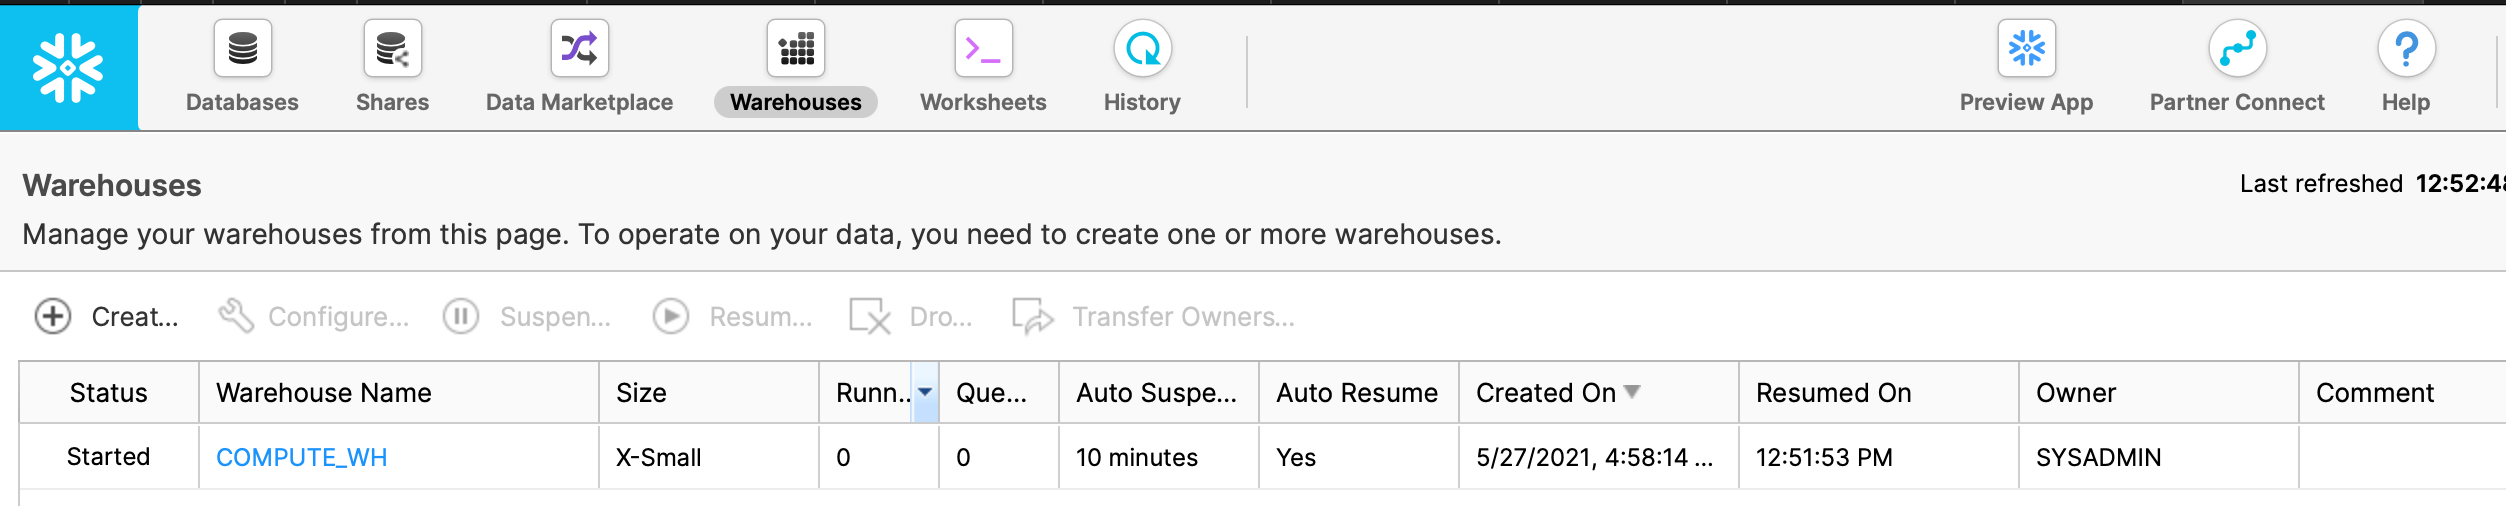
Note that the name of our warehouse in this case is COMPUTE_WH as we will use this name again shortly. If the warehouse
that you want to use is not in Started status, then you’ll need to start it before proceeding.
Next, click on the ‘Databases’ tab in the Snowflake UI and click on the ‘Create’ button to create a new database.
In this case, we’ve called our new database EMTELLIPRO, as shown in the screenshot below:
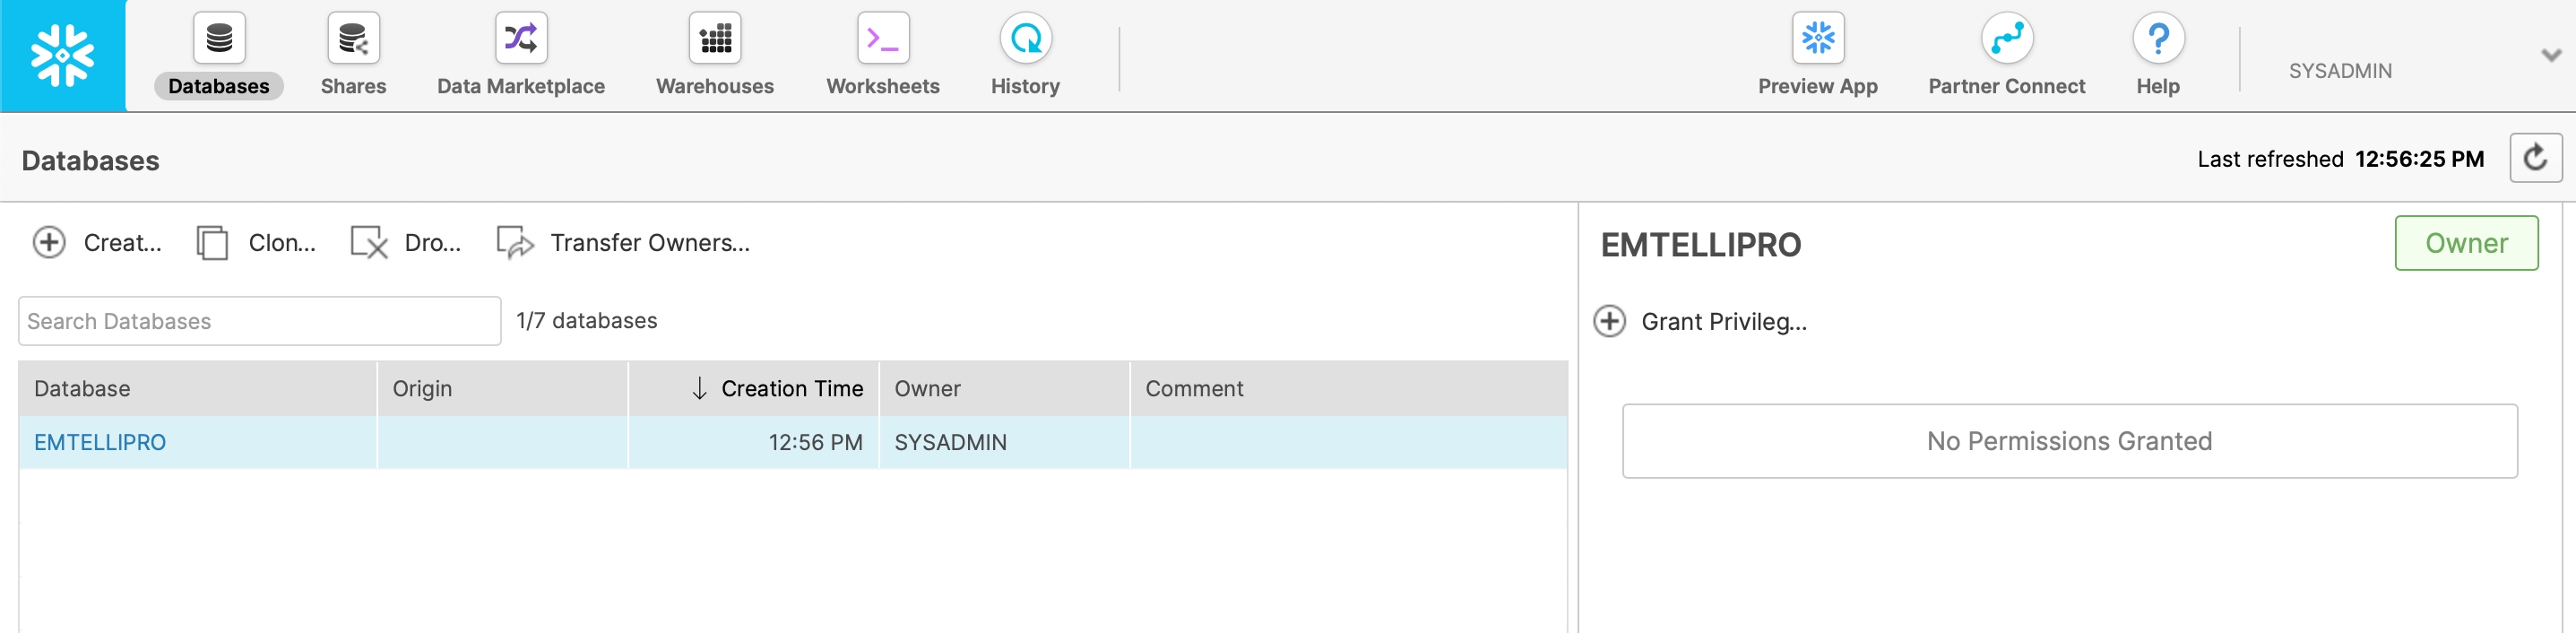
For the purposes of this howto, we’re just going to use the sysadmin’s username to access this database; we don’t need to set any additional privileges or do anything else at this point.
Step 3: Create the emtelliPro Tables
Next, we’ll use emtellipro-db-client to create the tables for storing the emtelliPro output in our new database.
For this step, make sure that you’re inside the Python virtual environment that we created in Step 1 above. If you have
dropped out of the Python venv, you can get back inside of it with:
source venv/bin/activate
You should take a minute to gather your variables, as there are quite a few in this step. The variables we’re going to need are:
<snowflake_username>- the Snowflake username we’ll use for this database<snowflake_password>- the Snowflake password for the account that we are using<snowflake_account>- the Snowflake account that we are using<snowflake_database>- the name of the database we created above (in this case, it isEMTELLIPRO)<snowflake_schema>- the Snowflake schema name that we are using (we will use the default schema ofPUBLIC)<snowflake_warehouse>- the name for our Snowflake warehouse (in this case, it isCOMPUTE_WH)<snowflake_role>- the Snowflake role name that we are using (for this username, it isSYSADMIN)
Now, let’s build the Snowflake URL that we are going to use for accessing our Snowflake database, which we’ll use in this step and in Step 4 below. It has the following format:
snowflake://<snowflake_username>:<snowflake_password>@<snowflake_account>/<snowflake_database>/<snowflake_schema>?warehouse=<snowflake_warehouse>&role=<snowflake_role>
Once we have plugged our variables into the URL, we can use it with the emtelliPro database client’s create-db command as follows:
emtellipro-db-client \
    --database "snowflake://user:password@account/EMTELLIPRO/PUBLIC?warehouse=COMPUTE_WH&role=SYSADMIN" \
    create-db
Note that the use of double-quotes in the example above are necessary to get bash to parse the command properly, and that
the line continuation character of \ is bash-specific; different shells (like the Windows command interpreter) use different
characters for this. If this command is successful in creating the tables, the database client should echo something back like:
Using plugins: None
Tables created
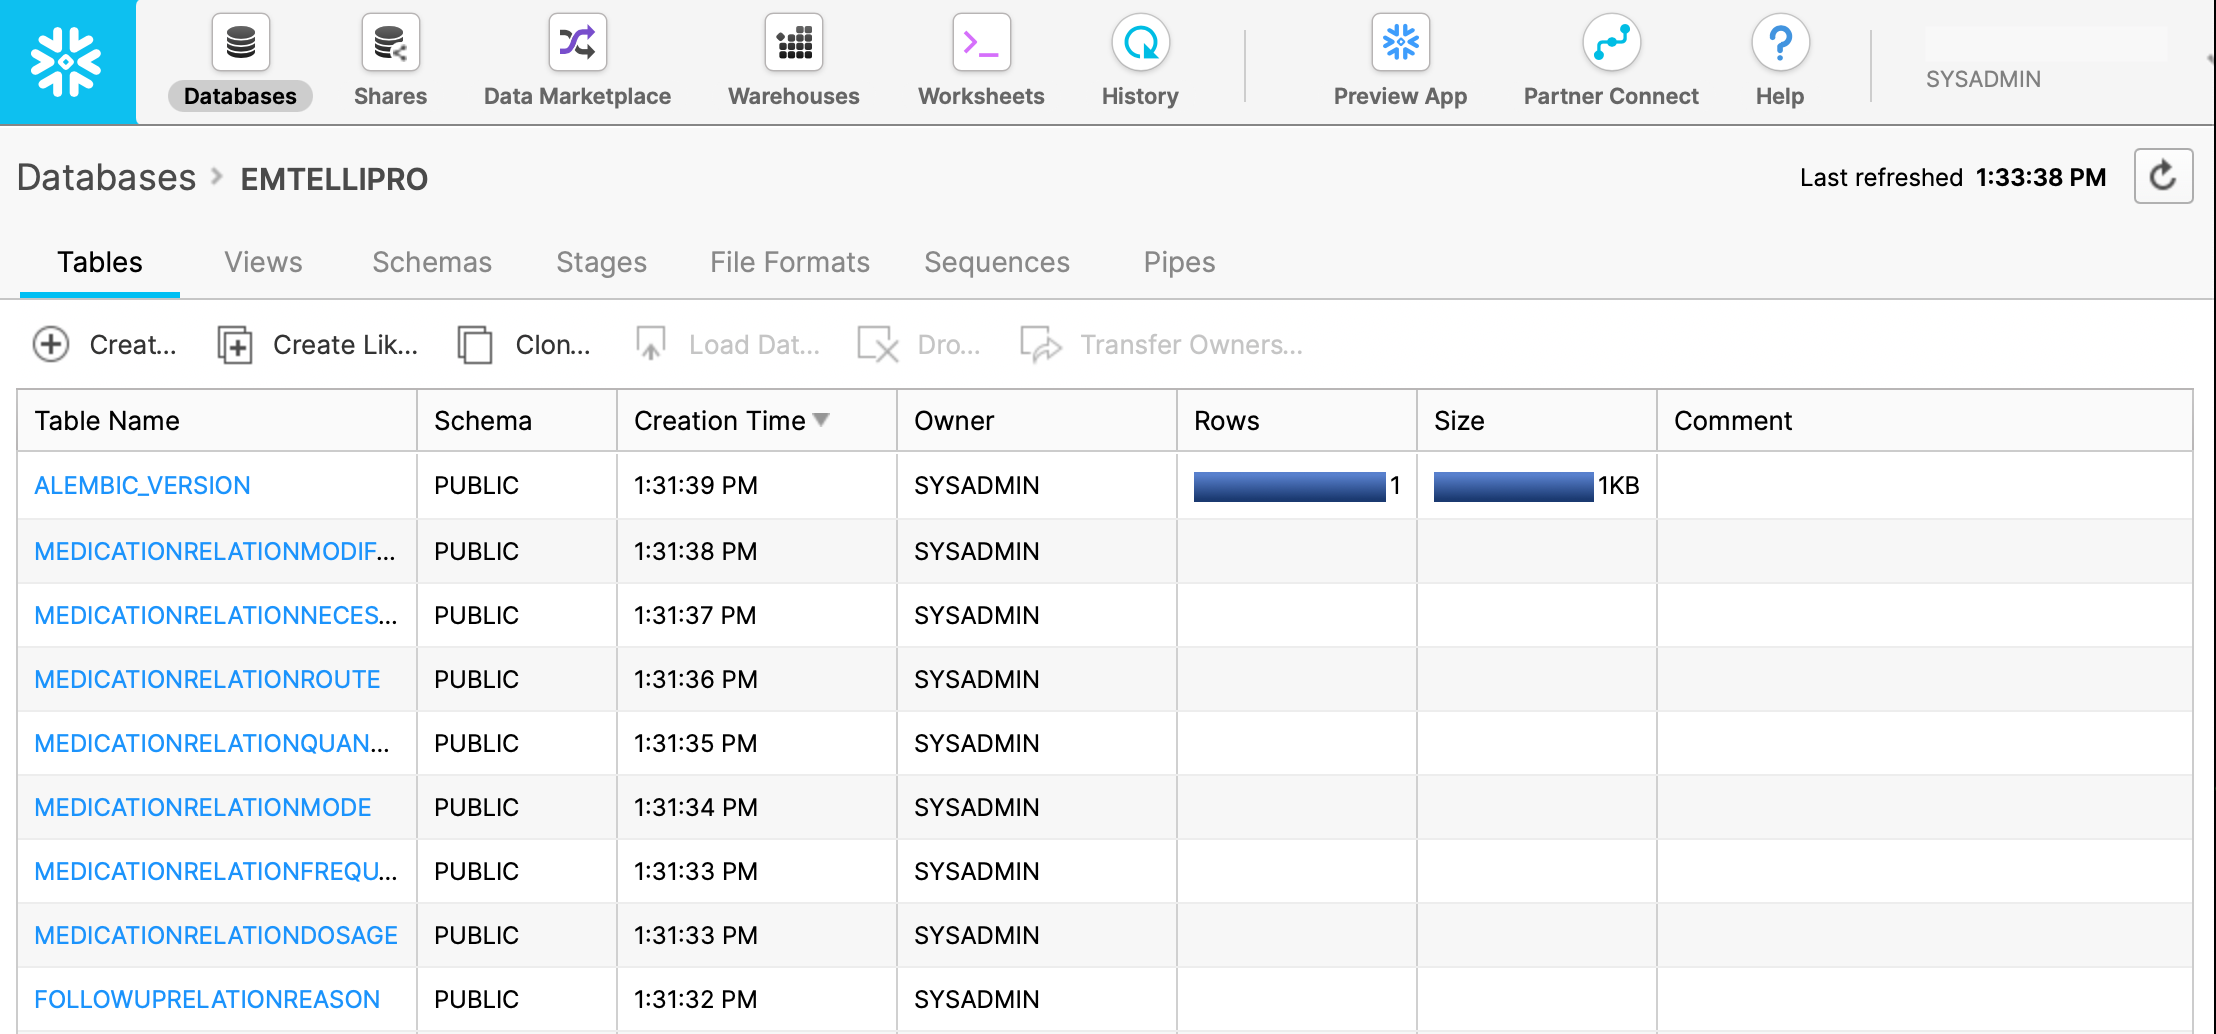
And in the Snowflake UI, the tables that were just created will be visible in the EMTELLIPRO database as shown below
(note that more tables are present than those shown in the screenshot):
Using private keys for authentication
All commands in the Python database client also take
--snowflake-private-key-path as an option alongside
--database. This option should be set to the path of the
private key used for the connecting to Snowflake. If using this
option, omit the password <snowflake_password> in the connection
URL above. To be consistent with SnowSQL, the passphrase for this
key file can be passed using SNOWFLAKE_PRIVATE_KEY_PASSPHRASE or
SNOWSQL_PRIVATE_KEY_PASSPHRASE in the environment, or if those
environment variables are not set, the client will prompt for the
passphrase if necessary. Both encrypted and unencrypted key files are
supported.
Step 4: Process a Sample Report and Store the Output in the Snowflake Database
In this processing example, we will use the Snowflake URL that we built in Step 3 above, and we will process the sample CT scan report
that is in the Python SDK in the file example-data/sample_ct_report.txt.
Again, inside of the Python virtual environment that has been used in these steps, we will process the sample CT scan report with
the command below. Note that the variables <access_key>, <secret_key>, and <server_url> are for the public access key, secret key,
and the emtelliPro server API URL that you are using. These should be assigned to you by emtelligent or your system administrator.
emtellipro-db-client \
    --database "snowflake://user:password@account/EMTELLIPRO/PUBLIC?warehouse=COMPUTE_WH&role=SYSADMIN" \
    process \
    --bulk-insert \
    --access-key <access_key> \
    --secret-key <secret_key>  \
    --server <server_url> \
    --document-type plain \
    --category Radiology \
    --subcategory CT \
    --job-id snowflake_demo \
    ./example-data/sample_ct_report.txt
If this command is successful, we should see output similar to the following:
Using plugins: None
NOTE: You've enabled bulk-inserts when saving. Due to bulk insertion the Storing progress bar below will only work in increments of 50 reports.
Connecting as [email protected]
Submitting 1 documents...
Processing: 100%|█████████████████████████████████████████████████████████████████████████████████████████████████████████████████████████| 1/1 [00:01<00:00]
Storing: 100%|████████████████████████████████████████████████████████████████████████████████████████████████████████████████████████████| 1/1 [06:47<00:00]
1 documents saved to database
Processed 1 reports in 10.83s for an average per report processing time of 10.827675s per report
Saved documents to database in 6:48s (6:48s / document)
The output above shows a successful processing and saving of a document to the Snowflake emtelliPro database that we have created. Note that the storage performance when using a hosted, cloud-based Snowflake instance can be less than that of a locally-hosted database due to network packetization and transit delays.
We can now go back to the Snowflake UI, and in the ‘Worksheets’ tab, select the EMTELLIPRO database and execute a simple query such as:
SELECT * FROM concept WHERE ontology='snomed';
From processing the sample_ct_report.txt document above, we would then expect to see output (based on the current version of emtelliPro)
similar to the following:
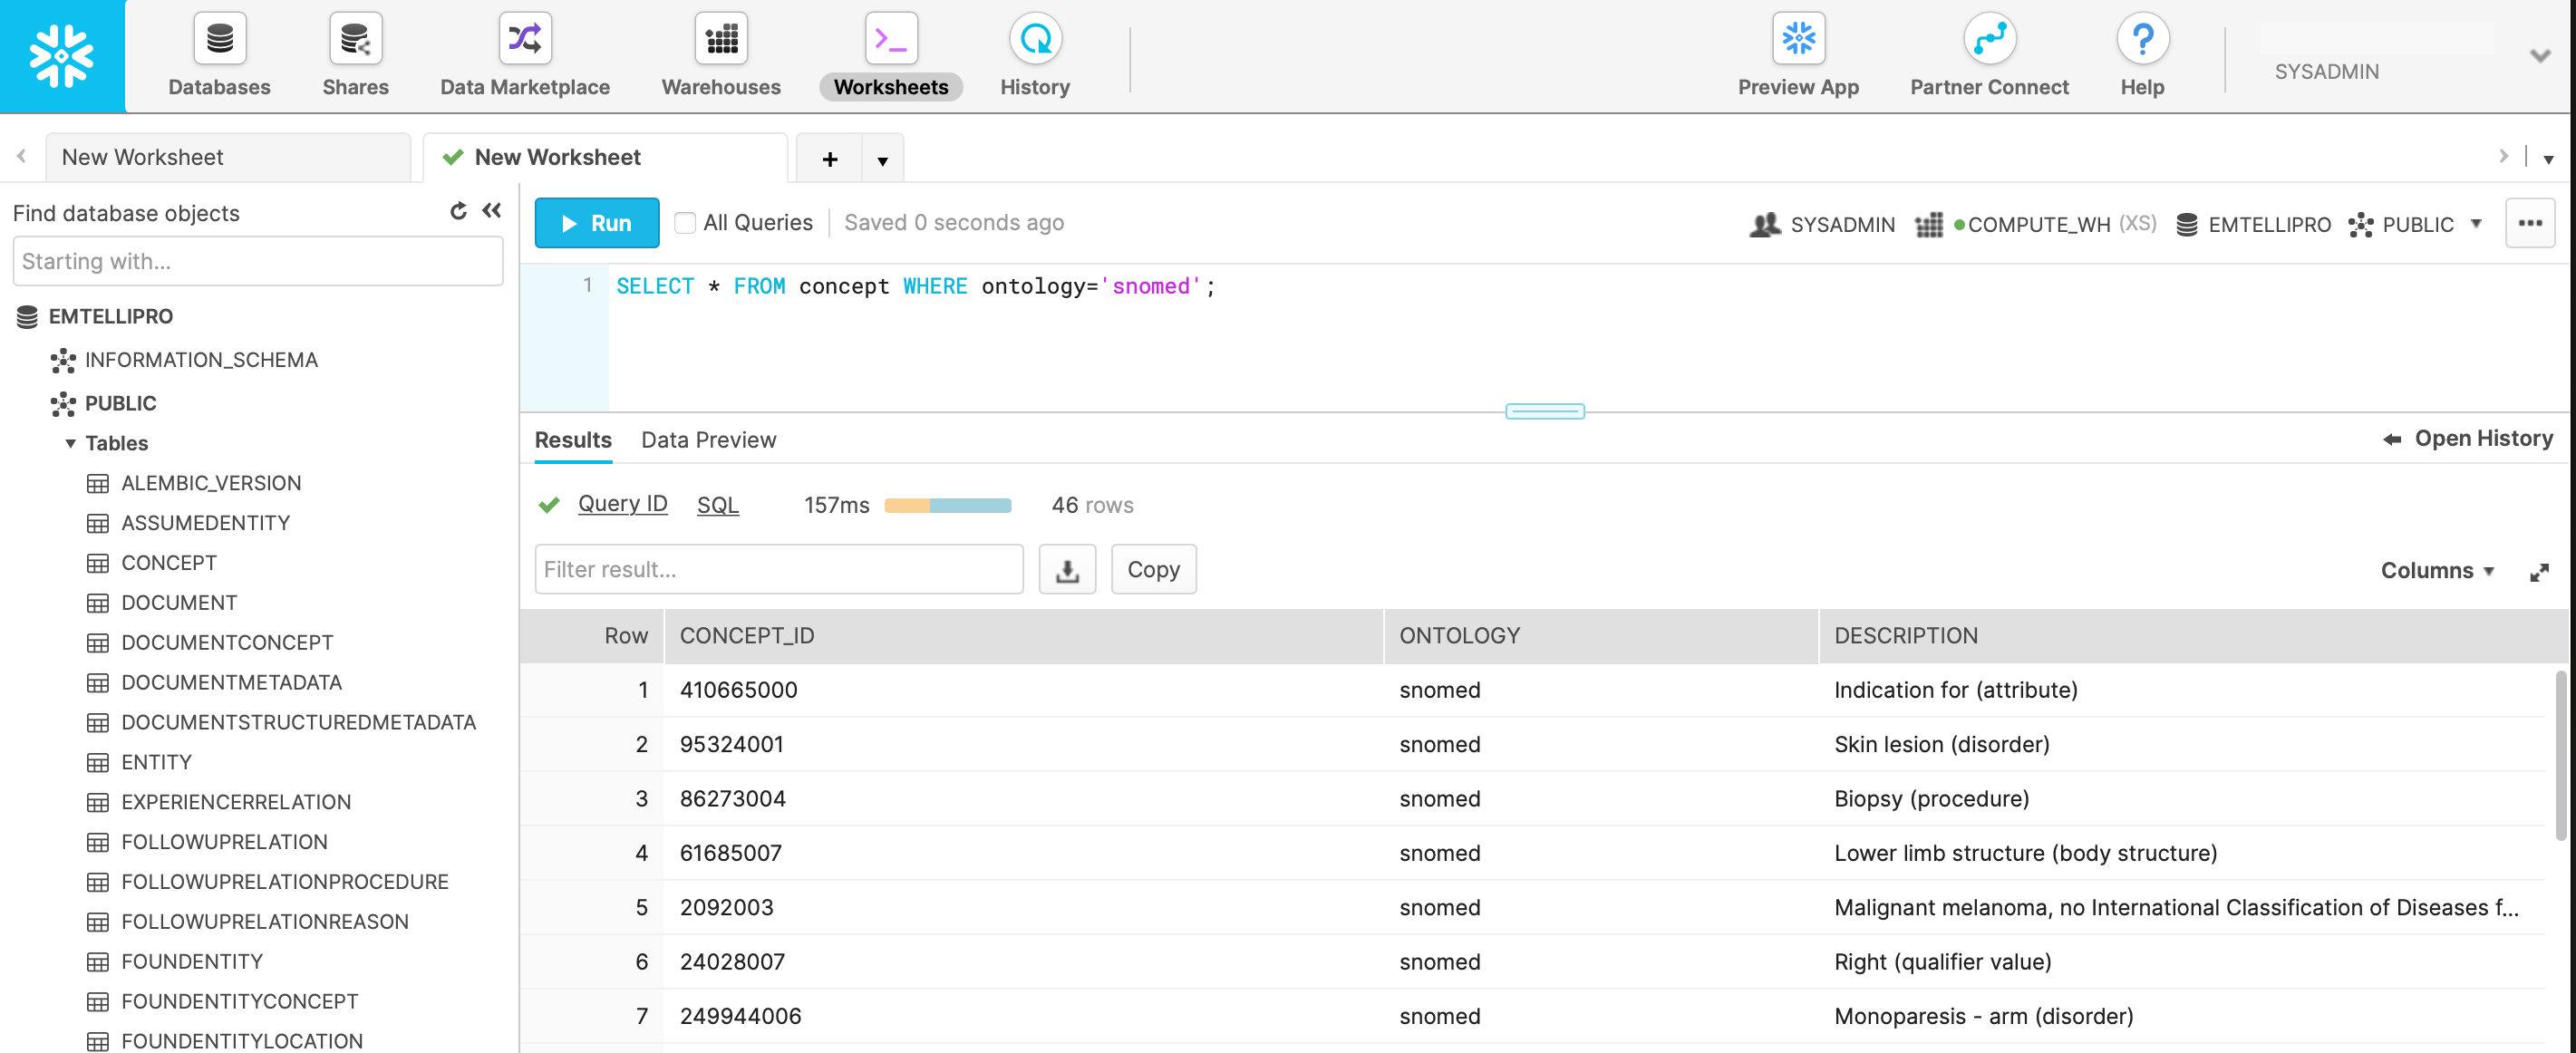
If you can see data similar to the above with this query, then you have been able to successfully process and store data from emtelliPro into a Snowflake-based emtelliPro database. For further reading on SQL queries, please see the documentation on the emtelliPro database schema.
Access JSON data in Snowflake
Depending on the options provided to the Python database client,
the entire JSON output from emtelliPro can be stored in the
document table in the emtelliPro database. The JSON is stored in the
JSON_REPRESENTATION column in the document table as a varchar
type. In order to access the JSON data in Snowflake the parse_json
SQL command is necessary.
SELECT parse_json(d.JSON_REPRESENTATION):id::string as id from document d;
This SQL statement returns a single column table of the task ids stored in the JSON.
CSV uploads to Snowflake
Creating sequences for unique numerical identifiers which is used in the emtelliPro database schema can be quite slow in Snowflake. One way around this is to use UUIDs for the identifiers and generate CSV files which can be uploaded to a Snowflake database. This process is much faster than the direct insertion into a Snowflake database described above. Using CSV uploads the concepts table might contain duplicates as Snowflake does not enforce the uniqueness constraint for file uploads. The user will have to run a post-process step to remove the duplicates or at least be aware of these duplicates in the concept table when writing the SQL queries against the database.
Steps 1 through 3 are the same as in the above section about direct insertion into a Snowflake database. Step 4 onwards will be different: we will create CSV files as the output emtelliPro database and then upload the CSV files to a Snowflake database.
Step 4: Process Data and Store the Output in CSV Files
This section provides an example processing run of some input data and storing the output in CSV files that can be then uploaded to the Snowflake database created in Steps 1 through 3 from the previous section.
Step 4a
First create a directory to store the CSV files. For this example,
let’s call this the csv_output directory.
Step 4b
Use the emtellipro database client to initialize the CSV output files
using create-db. I’m using the csv_output directory.
emtellipro-db-client \
  --database csv://csv_output \
  create-db
Step 4c
Process some Clinical text documents stored in the files
reports*.txt and store the output as CSV files to the directory
csv_output.
emtellipro-db-client \
  --database csv://csv_output \
  process \
  --access-key $(cat access.key) \
  --secret-key $(cat secret.key) \
  --server $(emtellipro-server) \
  --document-type plain \
  --category Clinical \
  --subcategory generic \
  --job-id csv \
  reports*.txt
Step 5: Use snowsql to upload the CSV files
Set up snowsql with the appropriate command line parameters or create
a config file by following the Snowflake documentation for snowsql.
Make sure you are in the directory where the csv files were created
(csv_output in our running example) or modify the script with the path
to the csv files. You may want to timestamp the csv files but the script
provided below simply removes the staged files after the insertion into
the snowflake database is done. The sample script below does not do a lot
of error checking and it just removes the uploaded csv files so please
examine the script carefully and try it on sample data before running
it on production data.
Assume that using Steps 1 through 3 of the previous section, the database
EMTELLIPRO has been created on Snowflake and the emtelliPro tables
have been created using the create-db option in the Python database
client. Also we assume below you have a config file setup for snowsql
for the EMTELLIPRO database on Snowflake.
Save the snowsql code provided at the end of this section to the file
snowflake_upload.sql and then run the SQL code using snowsql.
cd csv_output
snowsql -c EMTELLIPRO
In the snowsql interpreter type in:
!load snowflake_upload.sql
The emtelliPro database will be available on Snowflake once the upload completes successfully.
The Snowflake database can be queried just like the database created through direct insertion into Snowflake from the previous section.
The SQL code for snowflake_upload.sql:
-- snowflake_upload.sql
-- Uploads csv to table stage
-- Usage: Ensure the file names are correct in the PUT and COPY command (find/replace as needed)
--        Current file path assumes snowsql session is started in the directory containing the csvs

CREATE STAGE IF NOT EXISTS ASSUMEDENTITY;
CREATE STAGE IF NOT EXISTS CONCEPT;
CREATE STAGE IF NOT EXISTS DOCUMENT;
CREATE STAGE IF NOT EXISTS DOCUMENTCONCEPT;
CREATE STAGE IF NOT EXISTS DOCUMENTMETADATA;
CREATE STAGE IF NOT EXISTS DOCUMENTSTRUCTUREDMETADATA;
CREATE STAGE IF NOT EXISTS ENTITY;
CREATE STAGE IF NOT EXISTS EXPERIENCERRELATION;
CREATE STAGE IF NOT EXISTS FOLLOWUPRELATION;
CREATE STAGE IF NOT EXISTS FOLLOWUPRELATIONPROCEDURE;
CREATE STAGE IF NOT EXISTS FOLLOWUPRELATIONREASON;
CREATE STAGE IF NOT EXISTS FOUNDENTITY;
CREATE STAGE IF NOT EXISTS FOUNDENTITYCONCEPT;
CREATE STAGE IF NOT EXISTS FOUNDENTITYLOCATION;
CREATE STAGE IF NOT EXISTS FOUNDENTITYMEASUREMENTUNIT;
CREATE STAGE IF NOT EXISTS FOUNDENTITYSPAN;
CREATE STAGE IF NOT EXISTS FOUNDENTITYTYPE;
CREATE STAGE IF NOT EXISTS IMAGELINKRELATION;
CREATE STAGE IF NOT EXISTS IMAGELINKRELATIONIMAGEFINDING;
CREATE STAGE IF NOT EXISTS IMAGELINKRELATIONREFERENCE;
CREATE STAGE IF NOT EXISTS LOCATION;
CREATE STAGE IF NOT EXISTS MEASUREMENTRELATION;
CREATE STAGE IF NOT EXISTS MEDICATIONRELATION;
CREATE STAGE IF NOT EXISTS MEDICATIONRELATIONDOSAGE;
CREATE STAGE IF NOT EXISTS MEDICATIONRELATIONDURATION;
CREATE STAGE IF NOT EXISTS MEDICATIONRELATIONFREQUENCY;
CREATE STAGE IF NOT EXISTS MEDICATIONRELATIONINDICATION;
CREATE STAGE IF NOT EXISTS MEDICATIONRELATIONMODE;
CREATE STAGE IF NOT EXISTS MEDICATIONRELATIONMODIFIER;
CREATE STAGE IF NOT EXISTS MEDICATIONRELATIONNECESSITY;
CREATE STAGE IF NOT EXISTS MEDICATIONRELATIONQUANTITY;
CREATE STAGE IF NOT EXISTS MEDICATIONRELATIONROUTE;
CREATE STAGE IF NOT EXISTS PROCESSINGDETAILS;
CREATE STAGE IF NOT EXISTS QUALIFIERRELATION;
CREATE STAGE IF NOT EXISTS RELATION;
CREATE STAGE IF NOT EXISTS SECTIONLOCATION;
CREATE STAGE IF NOT EXISTS SECTIONLOCATIONSPAN;
CREATE STAGE IF NOT EXISTS SENTENCELOCATION;
CREATE STAGE IF NOT EXISTS SENTENCELOCATIONSPAN;
CREATE STAGE IF NOT EXISTS SENTENCESECTION;

PUT file://assumedentity.csv  @%ASSUMEDENTITY auto_compress=true;
PUT file://concept.csv  @%CONCEPT auto_compress=true;
PUT file://document.csv  @%DOCUMENT auto_compress=true;
PUT file://documentconcept.csv  @%DOCUMENTCONCEPT auto_compress=true;
PUT file://documentmetadata.csv  @%DOCUMENTMETADATA auto_compress=true;
PUT file://documentstructuredmetadata.csv  @%DOCUMENTSTRUCTUREDMETADATA auto_compress=true;
PUT file://entity.csv  @%ENTITY auto_compress=true;
PUT file://experiencerrelation.csv  @%EXPERIENCERRELATION auto_compress=true;
PUT file://followuprelation.csv  @%FOLLOWUPRELATION auto_compress=true;
PUT file://followuprelationprocedure.csv  @%FOLLOWUPRELATIONPROCEDURE auto_compress=true;
PUT file://followuprelationreason.csv  @%FOLLOWUPRELATIONREASON auto_compress=true;
PUT file://foundentity.csv  @%FOUNDENTITY auto_compress=true;
PUT file://foundentityconcept.csv  @%FOUNDENTITYCONCEPT auto_compress=true;
PUT file://foundentitylocation.csv  @%FOUNDENTITYLOCATION auto_compress=true;
PUT file://foundentitymeasurementunit.csv  @%FOUNDENTITYMEASUREMENTUNIT auto_compress=true;
PUT file://foundentityspan.csv  @%FOUNDENTITYSPAN auto_compress=true;
PUT file://foundentitytype.csv  @%FOUNDENTITYTYPE auto_compress=true;
PUT file://imagelinkrelation.csv  @%IMAGELINKRELATION auto_compress=true;
PUT file://imagelinkrelationimagefinding.csv  @%IMAGELINKRELATIONIMAGEFINDING auto_compress=true;
PUT file://imagelinkrelationreference.csv  @%IMAGELINKRELATIONREFERENCE auto_compress=true;
PUT file://location.csv  @%LOCATION auto_compress=true;
PUT file://measurementrelation.csv  @%MEASUREMENTRELATION auto_compress=true;
PUT file://medicationrelation.csv  @%MEDICATIONRELATION auto_compress=true;
PUT file://medicationrelationdosage.csv  @%MEDICATIONRELATIONDOSAGE auto_compress=true;
PUT file://medicationrelationduration.csv  @%MEDICATIONRELATIONDURATION auto_compress=true;
PUT file://medicationrelationfrequency.csv  @%MEDICATIONRELATIONFREQUENCY auto_compress=true;
PUT file://medicationrelationindication.csv  @%MEDICATIONRELATIONINDICATION auto_compress=true;
PUT file://medicationrelationmode.csv  @%MEDICATIONRELATIONMODE auto_compress=true;
PUT file://medicationrelationmodifier.csv  @%MEDICATIONRELATIONMODIFIER auto_compress=true;
PUT file://medicationrelationnecessity.csv  @%MEDICATIONRELATIONNECESSITY auto_compress=true;
PUT file://medicationrelationquantity.csv  @%MEDICATIONRELATIONQUANTITY auto_compress=true;
PUT file://medicationrelationroute.csv  @%MEDICATIONRELATIONROUTE auto_compress=true;
PUT file://processingdetails.csv  @%PROCESSINGDETAILS auto_compress=true;
PUT file://qualifierrelation.csv  @%QUALIFIERRELATION auto_compress=true;
PUT file://relation.csv  @%RELATION auto_compress=true;
PUT file://sectionlocation.csv  @%SECTIONLOCATION auto_compress=true;
PUT file://sectionlocationspan.csv  @%SECTIONLOCATIONSPAN auto_compress=true;
PUT file://sentencelocation.csv  @%SENTENCELOCATION auto_compress=true;
PUT file://sentencelocationspan.csv  @%SENTENCELOCATIONSPAN auto_compress=true;
PUT file://sentencesection.csv  @%SENTENCESECTION auto_compress=true;

COPY INTO ASSUMEDENTITY file_format = (type = csv skip_header = 1 field_optionally_enclosed_by='"', NULL_IF=('NULL')) on_error = 'skip_file';
COPY INTO CONCEPT file_format = (type = csv skip_header = 1 field_optionally_enclosed_by='"', NULL_IF=('NULL')) on_error = 'skip_file';
COPY INTO DOCUMENT file_format = (type = csv skip_header = 1 field_optionally_enclosed_by='"', NULL_IF=('NULL')) on_error = 'skip_file';
COPY INTO DOCUMENTCONCEPT file_format = (type = csv skip_header = 1 field_optionally_enclosed_by='"', NULL_IF=('NULL')) on_error = 'skip_file';
COPY INTO DOCUMENTMETADATA file_format = (type = csv skip_header = 1 field_optionally_enclosed_by='"', NULL_IF=('NULL')) on_error = 'skip_file';
COPY INTO DOCUMENTSTRUCTUREDMETADATA file_format = (type = csv skip_header = 1 field_optionally_enclosed_by='"', NULL_IF=('NULL')) on_error = 'skip_file';
COPY INTO ENTITY file_format = (type = csv skip_header = 1 field_optionally_enclosed_by='"', NULL_IF=('NULL')) on_error = 'skip_file';
COPY INTO EXPERIENCERRELATION file_format = (type = csv skip_header = 1 field_optionally_enclosed_by='"', NULL_IF=('NULL')) on_error = 'skip_file';
COPY INTO FOLLOWUPRELATION file_format = (type = csv skip_header = 1 field_optionally_enclosed_by='"', NULL_IF=('NULL')) on_error = 'skip_file';
COPY INTO FOLLOWUPRELATIONPROCEDURE file_format = (type = csv skip_header = 1 field_optionally_enclosed_by='"', NULL_IF=('NULL')) on_error = 'skip_file';
COPY INTO FOLLOWUPRELATIONREASON file_format = (type = csv skip_header = 1 field_optionally_enclosed_by='"', NULL_IF=('NULL')) on_error = 'skip_file';
COPY INTO FOUNDENTITY file_format = (type = csv skip_header = 1 field_optionally_enclosed_by='"', NULL_IF=('NULL')) on_error = 'skip_file';
COPY INTO FOUNDENTITYCONCEPT file_format = (type = csv skip_header = 1 field_optionally_enclosed_by='"', NULL_IF=('NULL')) on_error = 'skip_file';
COPY INTO FOUNDENTITYLOCATION file_format = (type = csv skip_header = 1 field_optionally_enclosed_by='"', NULL_IF=('NULL')) on_error = 'skip_file';
COPY INTO FOUNDENTITYMEASUREMENTUNIT file_format = (type = csv skip_header = 1 field_optionally_enclosed_by='"', NULL_IF=('NULL')) on_error = 'skip_file';
COPY INTO FOUNDENTITYSPAN file_format = (type = csv skip_header = 1 field_optionally_enclosed_by='"', NULL_IF=('NULL')) on_error = 'skip_file';
COPY INTO FOUNDENTITYTYPE file_format = (type = csv skip_header = 1 field_optionally_enclosed_by='"', NULL_IF=('NULL')) on_error = 'skip_file';
COPY INTO IMAGELINKRELATION file_format = (type = csv skip_header = 1 field_optionally_enclosed_by='"', NULL_IF=('NULL')) on_error = 'skip_file';
COPY INTO IMAGELINKRELATIONIMAGEFINDING file_format = (type = csv skip_header = 1 field_optionally_enclosed_by='"', NULL_IF=('NULL')) on_error = 'skip_file';
COPY INTO IMAGELINKRELATIONREFERENCE file_format = (type = csv skip_header = 1 field_optionally_enclosed_by='"', NULL_IF=('NULL')) on_error = 'skip_file';
COPY INTO LOCATION file_format = (type = csv skip_header = 1 field_optionally_enclosed_by='"', NULL_IF=('NULL')) on_error = 'skip_file';
COPY INTO MEASUREMENTRELATION file_format = (type = csv skip_header = 1 field_optionally_enclosed_by='"', NULL_IF=('NULL')) on_error = 'skip_file';
COPY INTO MEDICATIONRELATION file_format = (type = csv skip_header = 1 field_optionally_enclosed_by='"', NULL_IF=('NULL')) on_error = 'skip_file';
COPY INTO MEDICATIONRELATIONDOSAGE file_format = (type = csv skip_header = 1 field_optionally_enclosed_by='"', NULL_IF=('NULL')) on_error = 'skip_file';
COPY INTO MEDICATIONRELATIONDURATION file_format = (type = csv skip_header = 1 field_optionally_enclosed_by='"', NULL_IF=('NULL')) on_error = 'skip_file';
COPY INTO MEDICATIONRELATIONFREQUENCY file_format = (type = csv skip_header = 1 field_optionally_enclosed_by='"', NULL_IF=('NULL')) on_error = 'skip_file';
COPY INTO MEDICATIONRELATIONINDICATION file_format = (type = csv skip_header = 1 field_optionally_enclosed_by='"', NULL_IF=('NULL')) on_error = 'skip_file';
COPY INTO MEDICATIONRELATIONMODE file_format = (type = csv skip_header = 1 field_optionally_enclosed_by='"', NULL_IF=('NULL')) on_error = 'skip_file';
COPY INTO MEDICATIONRELATIONMODIFIER file_format = (type = csv skip_header = 1 field_optionally_enclosed_by='"', NULL_IF=('NULL')) on_error = 'skip_file';
COPY INTO MEDICATIONRELATIONNECESSITY file_format = (type = csv skip_header = 1 field_optionally_enclosed_by='"', NULL_IF=('NULL')) on_error = 'skip_file';
COPY INTO MEDICATIONRELATIONQUANTITY file_format = (type = csv skip_header = 1 field_optionally_enclosed_by='"', NULL_IF=('NULL')) on_error = 'skip_file';
COPY INTO MEDICATIONRELATIONROUTE file_format = (type = csv skip_header = 1 field_optionally_enclosed_by='"', NULL_IF=('NULL')) on_error = 'skip_file';
COPY INTO PROCESSINGDETAILS file_format = (type = csv skip_header = 1 field_optionally_enclosed_by='"', NULL_IF=('NULL')) on_error = 'skip_file';
COPY INTO QUALIFIERRELATION file_format = (type = csv skip_header = 1 field_optionally_enclosed_by='"', NULL_IF=('NULL')) on_error = 'skip_file';
COPY INTO RELATION file_format = (type = csv skip_header = 1 field_optionally_enclosed_by='"', NULL_IF=('NULL')) on_error = 'skip_file';
COPY INTO SECTIONLOCATION file_format = (type = csv skip_header = 1 field_optionally_enclosed_by='"', NULL_IF=('NULL')) on_error = 'skip_file';
COPY INTO SECTIONLOCATIONSPAN file_format = (type = csv skip_header = 1 field_optionally_enclosed_by='"', NULL_IF=('NULL')) on_error = 'skip_file';
COPY INTO SENTENCELOCATION file_format = (type = csv skip_header = 1 field_optionally_enclosed_by='"', NULL_IF=('NULL')) on_error = 'skip_file';
COPY INTO SENTENCELOCATIONSPAN file_format = (type = csv skip_header = 1 field_optionally_enclosed_by='"', NULL_IF=('NULL')) on_error = 'skip_file';
COPY INTO SENTENCESECTION file_format = (type = csv skip_header = 1 field_optionally_enclosed_by='"', NULL_IF=('NULL')) on_error = 'skip_file';

RM @~ pattern='.*\.csv\.gz';